How to Make a Video Loop for Ads (Meta & TikTok)
Jump to a section
- Why Video Loops Are a Secret Weapon for Performance Marketers
- The Four Core Techniques for a Perfect Seamless Loop
- Making Loops in After Effects with Expressions
- Creating Loops in Premiere Pro with Blending
- Quick Loops with Mobile Apps and FFmpeg
- Optimal Export Settings for Looping Ads on Social Media
- Using Loops in a High-Velocity Ad Production Workflow

You already know the pattern. One ad wins, spend rises, frequency creeps up, and the same creative starts fading faster than the team can replace it. Teams often respond by asking for more shoots, more edits, and more net-new concepts.
That helps, but it’s not the only answer.
If you need to make a video loop for Meta and TikTok, think bigger than a cosmetic edit. A clean loop turns a short clip into a reusable ad asset. It stretches footage, hides repetition, and gives you more ways to test hooks, bodies, and CTAs without rebuilding every ad from scratch.
Why Video Loops Are a Secret Weapon for Performance Marketers
Creative fatigue usually isn’t a production problem first. It’s a throughput problem. The team has footage, but not enough usable variations from that footage to keep testing velocity high.
That’s why looping matters. A looped product shot, demo, reaction clip, or texture background can keep moving in-feed without asking the viewer to process a hard restart. On short-form platforms, that small difference changes how long a piece of creative feels fresh.

A 2023 Wyzowl study found that looped videos can increase engagement by up to 50%, and HubSpot’s 2023 research found that looping product videos can lift conversion rates by 20%, as summarized in Vizard’s guide to looping video. For paid social teams, that’s the point. Better loops don’t just look cleaner. They give the same footage more selling power.
What looping changes in ad performance
A good loop does three things at once:
- Extends usable footage: A short clip becomes a stronger body asset for multiple ad variants.
- Reinforces the message: Repetition can repeat the product action or visual proof without feeling like a replay.
- Softens fatigue: A smooth motion cycle often feels less repetitive than a clip with an obvious stop.
Practical rule: If the reset is visible, the audience notices the edit. If the reset disappears, the audience focuses on the product.
This matters most when you’re testing at scale. A single looped product demo can support many versions of the same ad. One hook can lead into it. Then another. Then a UGC opener. Then a price-led intro. The body stays useful longer.
Teams building repeatable creative systems usually care less about one polished hero asset and more about asset flexibility. That’s the same logic behind modular production workflows like scaling ad creative production. You’re building pieces that can be recombined, not just final cuts.
Loops aren’t only for social ads
Looping also shows up in adjacent creator workflows. If you work with motion-first content outside paid social, the breakdown in Satura AI for YouTube automation is useful because it shows how loop-friendly content models depend on repeatable visuals, not constant new footage.
For Meta and TikTok, the practical takeaway is simple. Treat looping as a production strategy, not a timeline trick.
The Four Core Techniques for a Perfect Seamless Loop
Before you open After Effects or Premiere Pro, decide what kind of clip you have. Most looping problems come from choosing the wrong method for the footage.
Some clips want a natural reset. Others need disguise. Others only work if you turn them into a boomerang. And some clips need heavier manipulation to hide the seam.
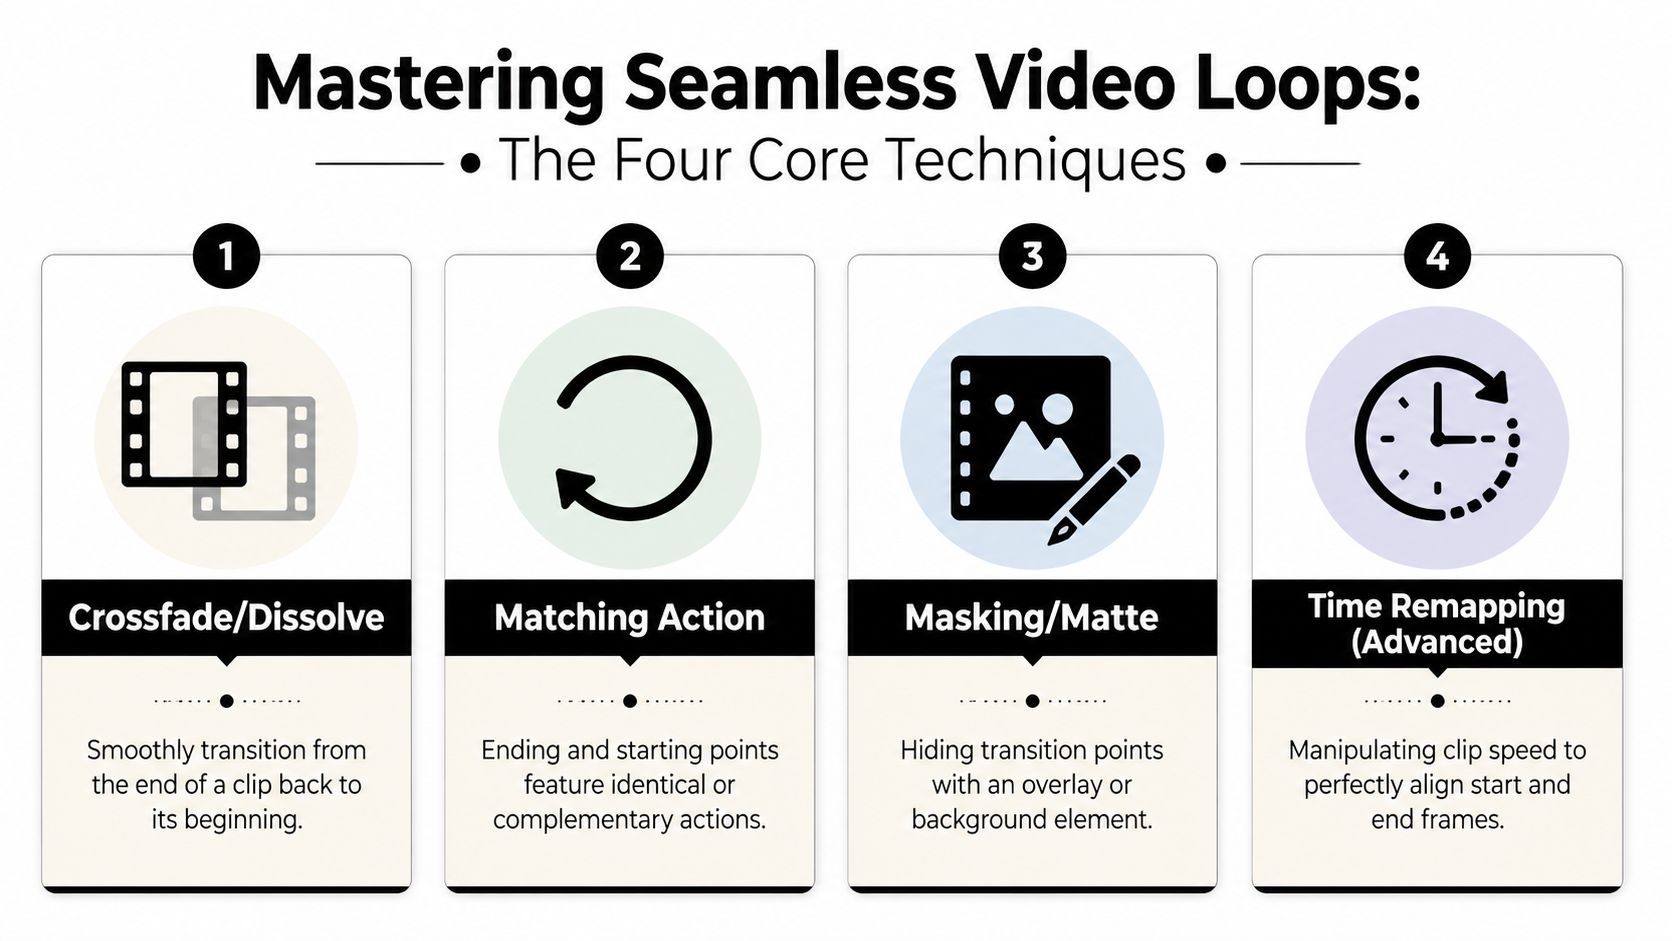
Matching action
This is the cleanest option when the first and last moments are visually compatible. Think steam rising, a product turning on a lazy Susan, someone holding a pose, or a subtle hand movement that returns close to where it began.
What works:
- Small cyclical motion: flowing liquids, blinking lights, ambient movement
- Stable framing: locked camera or minimal shake
- Neutral start and end frames: no major directional change
What fails:
- A person walking through frame once
- A hand grabbing a product and exiting
- Any shot where the ending clearly resolves an action
If you can make a video loop with matching action, do that first. It’s the least noticeable.
Crossfade or dissolve
When frames don’t naturally match, blend the tail into the head. This works well for backgrounds, textures, crowds, reflections, and product beauty shots where exact motion continuity matters less than smooth perception.
A crossfade doesn’t create true continuity. It creates visual forgiveness. That’s enough for many ads, especially when text overlays or captions pull focus.
A seamless loop doesn’t need to be mathematically perfect. It needs to survive a distracted feed scroll.
Reverse and blend
This is the classic boomerang approach. Duplicate the clip, reverse the copy, then join them. It’s strong for tactile actions such as pouring, opening, applying, squeezing, or unboxing, where a back-and-forth rhythm feels intentional.
Use it when:
- The action is short.
- The reversal won’t look absurd.
- The clip benefits from rhythmic repetition.
If the reversed motion breaks realism, skip it. Product foam flowing back into a bottle can look fake fast.
Masking and time remapping
These are the rescue tools. Masking hides the seam behind a foreground object or graphic element. Time remapping changes timing so the clip lands on a cleaner visual reset.
For social editors who want a stronger foundation in these workflows, this overview of video editing for social media is a useful reference because looping gets easier when the source footage is already structured for platform-native editing.
Making Loops in After Effects with Expressions
If you want precise control, After Effects is the best tool in the stack. It’s especially useful for product demos, animated graphics, UI motion, and branded end cards where the loop needs to be exact.
The standard method is Time Remapping plus the expression loopOut("cycle").
According to Boris FX’s guide to looping in After Effects, the loopOut("cycle") expression is the professional standard, and alt-clicking the Time Remap stopwatch to enter it gives you frame-accurate repetition. The same source notes success rates above 95% for clips with neutral start and end frames.
The exact workflow
Use this when you need a non-destructive loop:
- Import the clip into a new composition.
- Extend the composition length so the comp lasts longer than the source clip.
- Place the clip on the timeline.
- Enable Time Remapping by right-clicking the layer and choosing Time > Enable Time Remapping.
- Alt-click the stopwatch for Time Remap.
- Enter
loopOut("cycle"). - Trim or extend the layer to the total duration you want.
That setup is clean because you’re not manually copy-pasting clips across the timeline. If you change the source timing, the loop updates with it.
Where editors get tripped up
The expression doesn’t fix a bad clip. It only repeats what’s there. If the first frame and last frame fight each other, the loop will still jump.
Common issues:
- End frame mismatch: the reset is visible
- Audio discontinuity: the image loops, the sound clicks
- Wrong source choice: linear motion almost never loops cleanly without prep
A quick primer on understanding looping videos is helpful if you need a plain-language definition of what distinguishes a true smoothly transitioning loop from a simple replay.
Here’s a visual walkthrough of the After Effects approach:
Editor’s note: After Effects is strongest when the motion is controlled before the edit starts. Locked-off shots and predictable movement save far more time than expression tweaks later.
Creating Loops in Premiere Pro with Blending
Premiere Pro is the practical choice when you’re already assembling ad variants in a traditional timeline and don’t want to leave your NLE. It’s less elegant than an expression-based loop, but for organic footage it’s fast and reliable.
The core idea is simple. Split the clip at a good loop point, duplicate part of it, reverse if needed, and blend the seam.

A practical Premiere workflow
Start by scrubbing for a point where the motion could plausibly reconnect. Don’t look for perfection first. Look for compatibility.
Then use this sequence:
- Split at the best loop point: Cut where movement, framing, or subject position feels closest to the opening.
- Duplicate the segment: Place the duplicate after the original.
- Reverse the duplicate when needed: This creates the boomerang effect that often works for tactile or repetitive movement.
- Overlap the clips: Give yourself room to blend the transition.
- Apply cross-dissolve and audio fades: Smooth the visual seam and remove waveform clicks.
This method is especially good for lifestyle footage, fabric movement, pours, hand interactions, and soft product motion.
Audio is where most loops fall apart
Editors often focus only on the picture. That’s a mistake. A loop that looks smooth but pops in the audio still feels broken.
The YouTube tutorial referenced in the verified data notes that this Premiere approach can boost session watch time by 35% on TikTok and Reels, while 55% of first attempts run into audio pops if waveforms aren’t properly crossfaded, as shown in this Premiere Pro looping tutorial.
Use a short checklist before export:
| Check | Why it matters |
|---|---|
| Waveform fade | Prevents a click at the seam |
| Motion overlap | Hides the visual reset |
| Caption timing | Keeps text from exposing the loop point |
| Background music continuity | Avoids a restart feel even when the video loops cleanly |
If the viewer can hear the loop before they see it, the edit still failed.
Premiere rewards hands-on adjustment. It’s not the cleanest method on paper, but for day-to-day ad editing it’s often the fastest route from raw footage to usable loop.
Quick Loops with Mobile Apps and FFmpeg
Not every ad asset needs a desktop finishing pass. Sometimes you just need a fast loop for a TikTok-style concept, a rough-cut test, or a UGC variation that should feel native and unpolished.
That’s where mobile apps help. FFmpeg sits at the opposite end. It’s for teams that want automation, repeatability, and batch control.
Mobile apps for speed
CapCut is the obvious option for quick turnaround. The usual move is to duplicate the clip, reverse the copy, and join the two into a boomerang-style loop. For simple product actions or creator-style footage, that’s often enough.
Mobile wins when the priority is:
- Fast iteration: you need variants now
- Native-looking creative: polished doesn’t always outperform
- Light edits on the go: founders, creators, and small teams can ship without a desktop suite
If you’re trying to turn existing phone footage into a looping action clip, this guide on convert camera roll clips to boomerang is a practical reference for the basic reverse-and-repeat approach.
The trade-off is control. Mobile apps are great for obvious loops. They’re weaker when you need precise seam hiding, audio cleanup, or repeatable exports across lots of assets.
FFmpeg for scale
FFmpeg isn’t friendly, but it’s powerful. If your team has to process asset banks, normalize outputs, or automate repeatable video tasks, it becomes useful quickly.
Use FFmpeg when you need:
- Batch processing across many clips
- Consistent export behavior without manual editor choices
- Pipeline automation alongside broader production systems
It won’t replace creative judgment. You still need to pick clips that can loop well. But once your rules are set, FFmpeg can help standardize repetitive tasks.
A simple decision table makes the choice easier:
| Option | Best for | Weak spot |
|---|---|---|
| CapCut or similar mobile apps | Fast UGC-style loops | Less precision |
| Premiere Pro | Hands-on ad editing | More manual work |
| After Effects | Exact, frame-accurate loops | Slower for simple edits |
| FFmpeg | Bulk operations and scripting | Technical setup |
If you’re comparing where each tool fits in a broader stack, this breakdown of video production software comparison is useful because the best looping workflow usually depends on how your team already creates and exports ads.
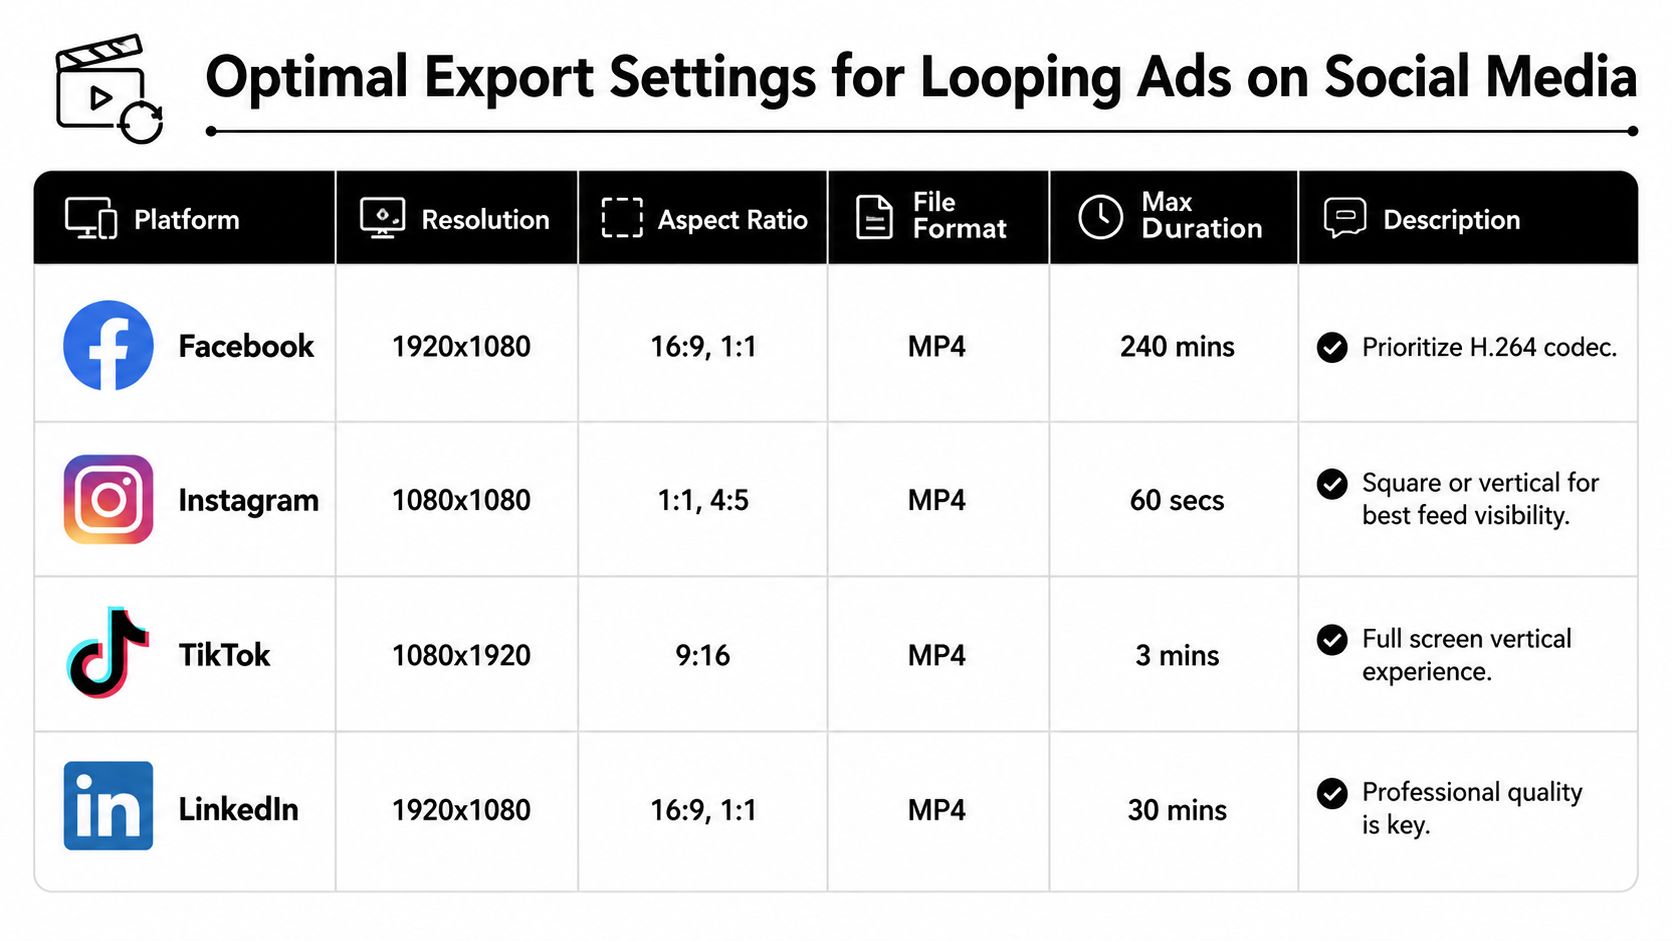
Optimal Export Settings for Looping Ads on Social Media
A perfect loop can still break at export. Compression artifacts, frame-rate mismatches, and bad audio settings can expose seams that looked fine in the edit.
For social ads, keep the export boring and consistent.
Baseline settings that usually hold up
For Meta and TikTok, the most dependable baseline is:
- Format: MP4
- Codec: H.264
- Resolution: 1080x1920 for vertical placements
- Frame rate: match your edit and keep it consistent
- Audio: AAC with matched sample settings across clips
If you’re exporting from Premiere Pro, the verified workflow calls for H.264 at 1080x1920, 30fps, and VBR 2-pass for Meta compatibility in the referenced tutorial already cited earlier. The key idea isn’t the preset itself. It’s consistency. Mismatched settings create friction where loops are most fragile.
What to check before upload
Use this pre-flight list:
- Seam visibility: Watch the export on repeat, not just once.
- Caption placement: Text shouldn’t land directly on the reset point.
- Audio continuity: The bed, voice, or effect shouldn’t restart awkwardly.
- Platform fit: Vertical loops belong in vertical placements first.
Export rule: If the platform is going to compress your file anyway, give it a clean, standard source. Don’t make the algorithm rescue a messy master.
For a broader placement reference, keep social media video specs handy when you’re adapting the same loop across feeds, stories, reels, and TikTok placements.
Using Loops in a High-Velocity Ad Production Workflow
The technical edit is only half the value. The main gain comes when loops become reusable components inside a modular ad system.
A looped body clip can support many ads without looking identical every time. Change the opener, swap the CTA, adjust overlays, and the same visual asset can keep working across multiple concepts. That’s how teams get more mileage from the same shoot.
Why most tutorials stop too early
Most looping tutorials end at “here’s how to make the motion connect perfectly.” That’s useful, but incomplete. The bigger operational problem is scale.
The verified research notes that most tutorials miss the need for batch processing and ad-platform optimization, while workflows built for multivariate testing can reduce CAC by 30% to 50%, as summarized in this analysis of modular loop workflows. That’s the strategic gap. Manual looping is fine for one asset. It breaks when you need a library.
How loops fit into modular creative
A strong workflow usually looks like this:
- Build loopable bodies: product demos, textures, UI captures, testimonials with stable framing
- Pair with multiple hooks: pain-point openers, offers, creator intros, problem-solution setups
- Swap CTAs last: preserve the useful middle while testing the close
- Store by asset type: make retrieval easy when building new combinations
If you’re trying to operationalize that approach, this guide on how to make 50 ads from one video aligns closely with how performance teams expand a small footage set into many testable variations.
The short version is simple. If you only use loops as an editing flourish, you’ll get cosmetic gains. If you use them as a modular asset strategy, you’ll get speed.
Sovran helps performance teams turn existing footage into modular ad systems built for testing velocity. If you need to produce and launch more video variations for Meta and TikTok without rebuilding every ad by hand, Sovran is designed for that workflow.

Manson Chen
Founder, Sovran
Related Articles

Demographic Targeting: A Performance Marketer's Guide 2026

Create Video Ads with AI That Perform in 2026